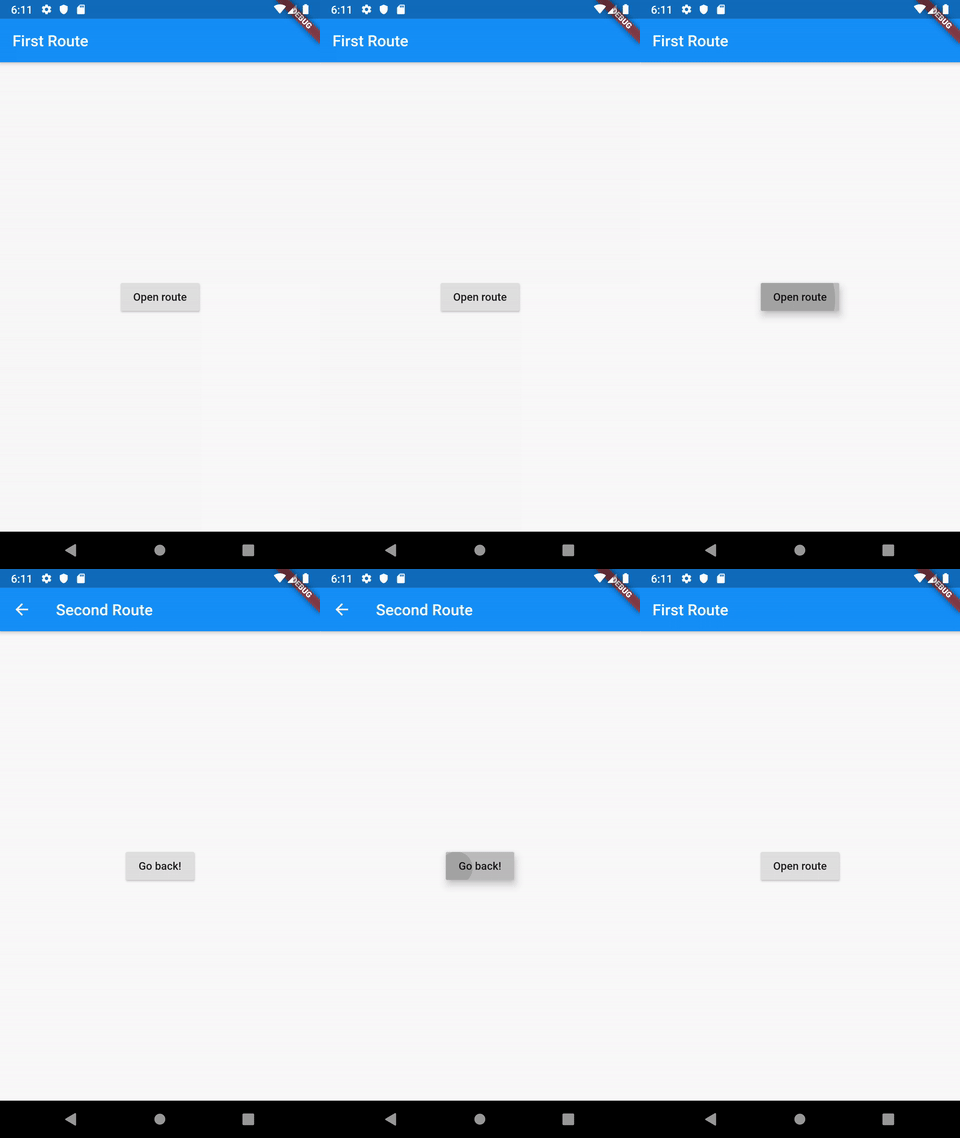
플루터 공식문서의 중첩 네비게이터 활용 사례에 대해 일부 내용을 정리해 보았다.
중첩 네비게이터 앱은 둘 이상의 네비게이터를 사용할 수 있음. 하나의 네비게이터를 다른 네비게이터 아래에 중첩하여 탭 내비게이션 등을 작성할 수 있음.
중첩 네비게이터 사용 예제
import 'package:flutter/material.dart';// ...void main() => runApp(new MyApp());// ...class MyApp extends StatelessWidget {
  @override
  Widget build(BuildContext context) {
    return MaterialApp(
      title: 'Flutter Code Sample for Navigator',
      // MaterialApp contains our top-level Navigator
      initialRoute: '/',
      routes: {
        '/': (BuildContext context) => HomePage(),
        '/signup': (BuildContext context) => SignUpPage(),
      },
    );
  }
}class HomePage extends StatelessWidget {
  @override
  Widget build(BuildContext context) {
    return DefaultTextStyle(
      style: Theme.of(context).textTheme.display1,
      child: Container(
        color: Colors.white,
        alignment: Alignment.center,
        child: Text('Home Page'),
      ),
    );
  }
}class CollectPersonalInfoPage extends StatelessWidget {
  @override
  Widget build(BuildContext context) {
    return DefaultTextStyle(
      style: Theme.of(context).textTheme.display1,
      child: GestureDetector(
        onTap: () {
          // This moves from the personal info page to the credentials page,
          // replacing this page with that one.
          Navigator.of(context)
            .pushReplacementNamed('signup/choose_credentials');
        },
        child: Container(
          color: Colors.lightBlue,
          alignment: Alignment.center,
          child: Text('Collect Personal Info Page'),
        ),
      ),
    );
  }
}class ChooseCredentialsPage extends StatelessWidget {
  const ChooseCredentialsPage({
    this.onSignupComplete,
  });  final VoidCallback onSignupComplete;  @override
  Widget build(BuildContext context) {
    return GestureDetector(
      onTap: onSignupComplete,
      child: DefaultTextStyle(
        style: Theme.of(context).textTheme.display1,
        child: Container(
          color: Colors.pinkAccent,
          alignment: Alignment.center,
          child: Text('Choose Credentials Page'),
        ),
      ),
    );
  }
}class SignUpPage extends StatelessWidget {
  @override
  Widget build(BuildContext context) {
    // SignUpPage builds its own Navigator which ends up being a nested
    // Navigator in our app.
    return Navigator(
      initialRoute: 'signup/personal_info',
      onGenerateRoute: (RouteSettings settings) {
        WidgetBuilder builder;
        switch (settings.name) {
          case 'signup/personal_info':
          // Assume CollectPersonalInfoPage collects personal info and then
          // navigates to 'signup/choose_credentials'.
            builder = (BuildContext _) => CollectPersonalInfoPage();
            break;
          case 'signup/choose_credentials':
          // Assume ChooseCredentialsPage collects new credentials and then
          // invokes 'onSignupComplete()'.
            builder = (BuildContext _) => ChooseCredentialsPage(
              onSignupComplete: () {
                // Referencing Navigator.of(context) from here refers to the
                // top level Navigator because SignUpPage is above the
                // nested Navigator that it created. Therefore, this pop()
                // will pop the entire "sign up" journey and return to the
                // "/" route, AKA HomePage.
                Navigator.of(context).pop();
              },
            );
            break;
          default:
            throw Exception('Invalid route: ${settings.name}');
        }
        return MaterialPageRoute(builder: builder, settings: settings);
      },
    );
  }
}
새로운 화면으로 이동하고, 되돌아오기


대부분의 앱은 여러 종류의 정보를 보여주기 위해 여러 화면을 갖고 있dma. 예를 들어, 어떤 앱이 상품 목록을 보여주는 화면을 갖고 있다고 한다면, 사용자가 한 상품을 선택했을 때 새로운 화면에서 해당 상품의 상세 정보를 볼 수 있음. 용어: Flutter에서 screen 과 page 는 route 로 불림.
Route는 Android의 Activity, iOS의 ViewController와 동일함. Flutter에서는 Route 역시 위젯임.
새로운 route로 Navigator를 사용하여 아래와 같은 단계로 진행하여 이동함.
- 두 개의 route를 생성합니다.
- Navigator.push()를 사용하여 두 번째 route로 전환합니다.
- Navigator.pop()을 사용하여 첫 번째 route로 되돌아 옵니다.
- 두 개의 route를 생성합니다. 우선 두 개의 route를 생성함. 예제에서는 첫 번째 route의 버튼을 누르면 두 번째 route로 화면 전환되며, 두 번째 route의 버튼을 누르면 첫 번째 route로 되돌아 옴.
class FirstRoute extends StatelessWidget {
  @override
  Widget build(BuildContext context) {
    return Scaffold(
      appBar: AppBar(
        title: Text('First Route'),
      ),
      body: Center(
        child: RaisedButton(
          child: Text('Open route'),
          onPressed: () {
            // 눌렀을 때 두 번째 route로 이동합니다.
          },
        ),
      ),
    );
  }
}class SecondRoute extends StatelessWidget {
  @override
  Widget build(BuildContext context) {
    return Scaffold(
      appBar: AppBar(
        title: Text("Second Route"),
      ),
      body: Center(
        child: RaisedButton(
          onPressed: () {
            // 눌렀을 때 첫 번째 route로 되돌아 갑니다.
          },
          child: Text('Go back!'),
        ),
      ),
    );
  }
}- Navigator.push()를 사용하여 두 번째 route로 전환합니다. 새로운 route로 전환하기 위해 Navigator.push() 메서드를 사용함. push() 메서드는 Route를 Navigator에 의해 관리되는 route 스택에 추가함. Route는 직접 생성하거나, 새로운 route로 이동시 MaterialPageRoute를 사용할 수 있음.
// Within the `FirstRoute` widget
onPressed: () {
  Navigator.push(
    context,
    MaterialPageRoute(builder: (context) => SecondRoute()),
  );
}- Navigator.pop()을 사용하여 첫 번째 route로 되돌아 옴. 두 번째 route를 닫고 이전 route로 Navigator.pop() 메서드를 사용여 되돌아감. pop() 메서드는 Navigator에 의해 관리되는 route 스택에서 현재 Route를 제거함.
// Within the SecondRoute widget
onPressed: () {
  Navigator.pop(context);
}
완성된 예제
content_copy
import 'package:flutter/material.dart';void main() {
  runApp(MaterialApp(
    title: 'Navigation Basics',
    home: FirstRoute(),
  ));
}class FirstRoute extends StatelessWidget {
  @override
  Widget build(BuildContext context) {
    return Scaffold(
      appBar: AppBar(
        title: Text('First Route'),
      ),
      body: Center(
        child: RaisedButton(
          child: Text('Open route'),
          onPressed: () {
            Navigator.push(
              context,
              MaterialPageRoute(builder: (context) => SecondRoute()),
            );
          },
        ),
      ),
    );
  }
}class SecondRoute extends StatelessWidget {
  @override
  Widget build(BuildContext context) {
    return Scaffold(
      appBar: AppBar(
        title: Text("Second Route"),
      ),
      body: Center(
        child: RaisedButton(
          onPressed: () {
            Navigator.pop(context);
          },
          child: Text('Go back!'),
        ),
      ),
    );
  }
}'flutter' 카테고리의 다른 글
| [Flutter] flutter 프로젝트 새로 생성하기 (0) | 2021.11.16 |
|---|---|
| [Flutter] Flutter Navigator 사용법 (5) (0) | 2021.11.16 |
| [Flutter] Flutter Navigator 사용법 (4) (0) | 2021.11.16 |
| [Flutter] Flutter Navigator 사용법(3) (0) | 2021.11.16 |
| [Flutter] Flutter Assets와 image추가하기 (0) | 2021.11.16 |


